
MyBatis Framework
简介:
MyBatis 框架是一款优秀的持久层框架,它支持定制化 SQL、存储过程以及高级映射。MyBatis 避免了几乎所有的 JDBC 代码和手动设置参数以及获取结果集。MyBatis 可以使用简单的 XML 或注解来配置和映射原生信息,将接口和 Java 的 POJOs(Plain Old Java Objects,普通的 Java对象)映射成数据库中的记录
本系列笔记可能会遇到的专业词汇有:
- Framework, 框架,某一类问题的总体解决方案
- ORM,
Object Relationship Mapping, 对象关系映射 - DATABASE, 数据库,存储数据的一种方式
- Mapper,
是一种mybatis做持久层的称谓, 相当于DAO层,所不同的是Mapper只需要提供接口和对应的xml文件,无需实现 - SqlSession, myBatis会话, 一般做为局部变量进行操作
- SqlSessionFactory, SqlSession的工厂,用来创建SqlSession实例
本系列笔记包含如下的课程内容:
- MyBatis入门教程和日志配置
- MyBatis框架配置文件和映射文件
- 配置文件详解
- xml映射文件详解
- 注解映射详解
- 关联映射和动态SQL机制
- 缓存机制和API分析
- 一级缓存
- 二级缓存
- 核心API分析
- myBatis+Spring 整合
- Spring+MyBatis+SpringMVC 整合
Spring+MyBatis+SpringMVC 整合
SSM整合现在变得越来越流行,基于mybatis的轻量级数据访问操作,可以大大提高数据的检索能力;我们在第5讲中已经详细介绍了Spring+mybatis的组合,现在我们再来讲讲如何整合进SPRING MVC中,这样我们就可以利用spring+spring mvc+mybatis进行JAVA WEB开发,基于spring mvc的强大能力,可以很轻松地实现java web项目的开发
我们的教案同样采用maven进行项目管理,相比之前的教程,我们还要依赖于spring mvc,如下:
- mybatis
- mybatis-spring
- spring-context
- spring-mvc
- spring-jdbc
- spring-aspects
- mysql-connector-java [不同的数据库,选用不同的驱动]
- druid [可以选择其它的连接池组件]
- log4j [可以选择其它的日志实现]
- junit [可以选择其它的单元测试框架]
需要注意的是,我们要创建一个web项目,通过maven管理时也可以创建web项目的骨架, 相比普通项目,多出了 webapp 相关的目录,如果对于maven创建和管理web项目不熟悉的话,请查看相关maven的资料. 下面是项目在Eclipse下的结构图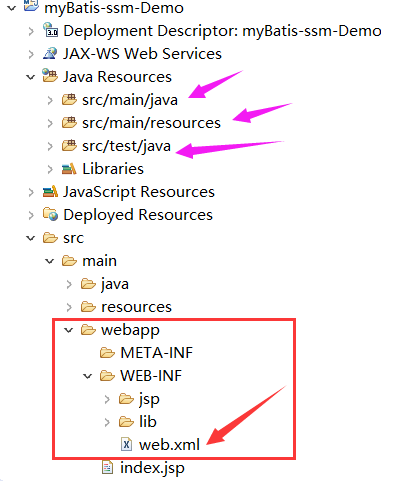
我们整个教程的步骤按如下顺序编写:【省去了创建maven项目的过程】
- pom.xml 依赖管理
- web.xml 配置 [重点]
- spring 配置文件
- spring 主配置,含与mybatis的整合、事务的配置
- spring mvc配置,主要是web相关的配置
- mybatis 配置文件
- 日志配置文件
- 持久层Dao/mapper配置
- 业务层Service
- WEB控制层Controller
- 部署测试
- 总结
pom.xml配置
1 | <project xmlns="http://maven.apache.org/POM/4.0.0" xmlns:xsi="http://www.w3.org/2001/XMLSchema-instance" |
可以直接copy到你自己项目的pom.xml中,当然,命名空间什么的你自己修改一下即可。
上面的配置中都有做相关的注释说明,此处不再描述。
web.xml配置【重点】
这个文件是web项目启动的入口,所有的java web项目都有这个文件【纯注解配置除外】,根据WEB Container加载和启动web项目的规则知道,容器首先会读取web.xml的配置,所以,我们也需要在此文件中配置spring和spring mvc,如下:
1 | <?xml version="1.0" encoding="UTF-8"?> |
注:需要注意的是,我们此处把spring框架的DI,AOP相关的配置通过全局的ContextLoaderListener负责加载读取,而前端控制器DispatcherServlet只负责加载springmvc相关的配置,这样的好处就是可以单独配置,而不必全部配置在一起。
根据web容器加载策略,首先会读取Listener配置,其次是Filter,最后就是使用了 load-on-startup配置的Servlet, 所以,首先会通过ContextLoaderListener读取的spring配置,配置文件存放在spring/applicationContext-.xml中,代表通配,读取后存放在全局范围的,然后初台化前端控制器DispatcherServlet,它会读取spring/springmvc.xml配置,并会自动
继承全局的配置。
由于此处并不是讲解spring mvc框架的工作原理,所以,不再细述这个过程。
spring配置文件
由于我们采用分开配置的策略,把spring mvc的配置、spring-mybatis配置、spring事务的配置都各自单独抽取出来,所以,我们有多个不同的配置文件,下面一一说明
先看一下项目结构:

applicationContext-mybatis.xml 配置
此文件是spring与mybatis的集成配置,负责扫描 dao 所在的包,也就是创建相关的bean[由mybatis动态产生的代理], 如下:
1 | <?xml version="1.0" encoding="UTF-8"?> |
db.properties的配置:
2
3
4
5
6
7
8
9
10
11
12
mysql_driver=com.mysql.jdbc.Driver
mysql_url=jdbc:mysql://localhost:3306/mybatisdb?useUnicode=true&characterEncoding=utf-8
mysql_user=*****
mysql_pwd=******
# commons properties about pools
initialSize=2
maxActive=5
minIdle=2
maxWait=60000
testWhileIdle=false
applicationContext-tx.xml 配置
这个文件主要针对事务的管理和配置,同时,扫描业务层所在的包结构,也就是负责创建Service层的bean,如下:
1 | <?xml version="1.0" encoding="UTF-8"?> |
springmvc.xml配置
要使用spring mvc框架的核心配置,它负责扫描控制层,创建控制层的bean, 如下:
1 | <?xml version="1.0" encoding="UTF-8"?> |
mybatis-config.xml配置
此文件是mybatis的主体配置,上面在 applicationContext-mybatis.xml中指定了要读取这个文件
1 | <?xml version="1.0" encoding="UTF-8"?> |
可以看出,这个文件并不需要做什么特殊的处理。
日志配置文件【可选】
配置略….
可以查看看之前的教程,请点击此处看系列教程
持久层Dao和xml文件
这部份代码与单独使用mybatis是一样的,没有任何区别,由于之前的系列教程都已写明操作步骤,此处不再描述,如果对mybatis框架下的dao和xml文件的开发不熟悉,请查看之前的学习文档。
代码略….
如需要看之前的教程,请点击此处看系列教程
业务层Service
这一层代码是之前的教程中没有写的,之前我们直接在测试代码中使用mybatis的API来做CRUD操作获取数据,现在通过DI框架,我们可以在Service接口的实现类中注入目标Dao[动态生成的], 下面是代码和配置
先看一下代码结构: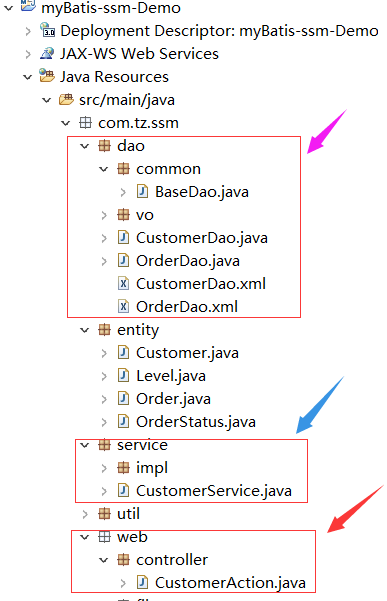
1 | // 代码片断 |
WEB控制层Controller
在控制中需要注入业务层,如下:
1 | package com.tz.ssm.web.controller; |
jsp如下:
list.jsp1
2
3
4
5
6
7
8
9
10
11
12
13
14
15
16
17
18
19
20
21
22
23
24
25
26
27
28
29
30<%@ page pageEncoding="UTF-8" contentType="text/html;charset=UTF-8" %>
<%@ taglib uri="http://java.sun.com/jsp/jstl/core" prefix="c" %>
<html>
<body>
<h2>客户列表</h2>
<hr/>
<table style="width:80%">
<tr>
<th>序号</th>
<th>姓名</th>
<th>住址</th>
<th>电话</th>
<th>等级</th>
<th>操作</th>
</tr>
<c:forEach items="${CUSTOMER_LIST}" var="c" varStatus="vs">
<tr>
<td>${vs.count }</td>
<td>${c.name }</td>
<td>${c.location }</td>
<td>${c.mobilePhone }</td>
<td>${c.level }</td>
<td>
<a href="view_order?customerId=${c.id}">查看订单</a>
</td>
</tr>
</c:forEach>
</table>
</body>
</html>
listOrder.jsp1
2
3
4
5
6
7
8
9
10
11
12
13
14
15
16
17
18
19
20
21
22
23
24
25
26
27
28
29<%@ page pageEncoding="UTF-8" contentType="text/html;charse=UTF-8" %>
<%@ taglib uri="http://java.sun.com/jsp/jstl/core" prefix="c" %>
<html>
<body>
<h2>客户订单</h2>
<hr/>
<table style="width:80%">
<tr>
<th>序号</th>
<th>订单编号</th>
<th>订单费用</th>
<th>下单时间</th>
<th>出货时间</th>
<th>订单状态</th>
<th>操作</th>
</tr>
<c:forEach items="${ORDER_LIST}" var="o" varStatus="vs">
<tr>
<td>${vs.count }</td>
<td>${o.ordNo }</td>
<td>${o.cost }</td>
<td>${o.orderDate }</td>
<td>${o.shipDate }</td>
<td>${o.status }</td>
</tr>
</c:forEach>
</table>
</body>
</html>
单元测试代码
这里主要是针对Dao和Service层进行单元测试,如下:
由于我们的log4j.properties 文件存放在了config文件夹下,所以,我们需要指定这个位置,否则,默认情况下,测试框架找不到这个文件,我们只需写一个类继承SpringJUnit4ClassRunner类,如下:1
2
3
4
5
6
7
8
9
10
11
12
13
14
15
16
17
18
19
20
21
22
23
24
25
26
27
28
29
30
31
32
33package com.tz.ssm;
import java.io.FileNotFoundException;
import org.junit.runners.model.InitializationError;
import org.springframework.test.context.junit4.SpringJUnit4ClassRunner;
import org.springframework.util.Log4jConfigurer;
/**************
* 通过这个测试类来指定log4j配置文件的位置
* @author yejf
*
*/
public class MyJunit4ClassRunner extends SpringJUnit4ClassRunner {
/*******
* 使用静态代码块来指定log4j的配置文件位置
*/
static {
System.out.println("--- 指定log4j的位置");
try {
Log4jConfigurer.initLogging("classpath:config/log4j.properties");
} catch (FileNotFoundException e) {
System.out.println("不能初始化log4j...");
e.printStackTrace();
}
}
public MyJunit4ClassRunner(Class<?> clazz) throws InitializationError {
super(clazz);
}
}
然后现写一个junit的基础测试类,此类的目的是读取spring相关的配置文件,如下:1
2
3
4
5
6
7
8
9
10
11
12
13package com.tz.ssm;
import org.junit.runner.RunWith;
import org.springframework.test.context.ContextConfiguration;
import org.springframework.test.context.junit4.AbstractJUnit4SpringContextTests;
//这个类指定了log4j的位置,这里的 MyJunit4ClassRunner就是上面我们自定义的类型
(MyJunit4ClassRunner.class)
//指定要读取的文件位置
(locations="classpath:spring/applicationContext-*.xml")
public class BaseTest extends AbstractJUnit4SpringContextTests {
}
下面来看看Dao的测试:1
2
3
4
5
6
7
8
9
10
11
12
13
14
15
16
17
18
19
20
21
22
23package com.tz.ssm.dao;
import org.junit.Assert;
import org.junit.Test;
import org.springframework.beans.factory.annotation.Autowired;
import com.tz.ssm.BaseTest;
import com.tz.ssm.entity.Customer;
public class CustomerDaoTest extends BaseTest {
//注入Dao
private CustomerDao customerDao;
public void testFindById() {
//
Customer c = customerDao.findById(2);
Assert.assertNotNull(c);
System.out.println(c);
}
}
再来看看Service的测试1
2
3
4
5
6
7
8
9
10
11
12
13
14
15
16
17
18
19
20
21
22package com.tz.ssm.service;
import org.junit.Assert;
import org.junit.Test;
import org.springframework.beans.factory.annotation.Autowired;
import com.tz.ssm.BaseTest;
import com.tz.ssm.entity.Customer;
public class CustomerServiceTest extends BaseTest {
//注入业务层
private CustomerService customerService;
public void testFindById() {
Customer c = customerService.findById(2);
//
Assert.assertNotNull(c);
System.out.println(c);
}
}
部署测试
由于我们在pom.xml中导入了tomcat7插件,所以,我们可以通过如下命令来启动服务
1 | mvn tomcat7:run |
打开浏览器,输入:http://locahost:8888/ssm-demo/list 即可以看到客户列表页面。
注:前提是事先创建好表结构,以及确保数据库启动。
总结
通过spring,spring mvc, mybatis三者的整合,我们可以高效、快速地进行java web项目的开发,本教案可以让你快速创建持久层、业务层,将来可以在控制层中很好地调用这些层做为支撑。同时,也可以看到,整体配置简洁、方便,并没有很复杂的地方,相信根据本文,你也可以快带地构建起SSM的项目。