Fork me on GitHub

SpringMVC学习2-HelloWorld案例

Spring MVC

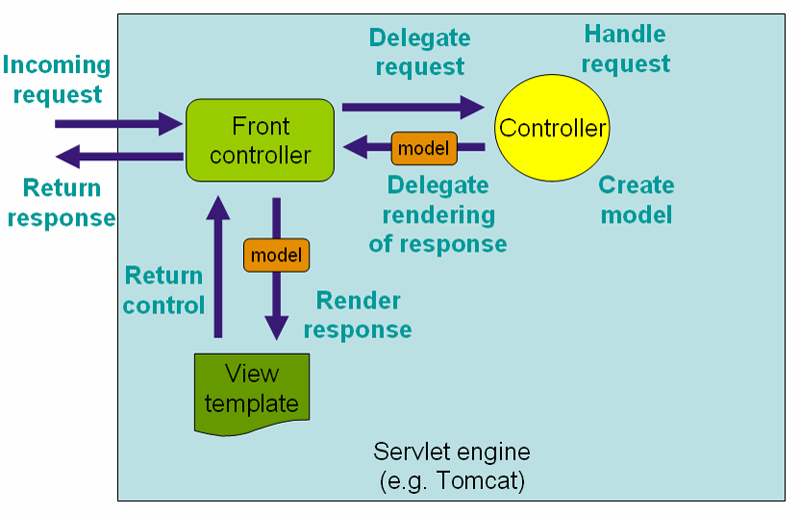
SpringMVC是基于MVC思想的JAVA WEB实现框架,是Spring家族的一员,它基于前置控制器来接收并分发请求,支持参考验证、请求参数封装、拦截、Restful等功能,是目前较为流行的MVC框架

本系列学习笔记包含如下的课程内容:

  • MVC思想
  • Hello案例
  • 请求和响应处理
  • 文件上传和下载处理
  • 参数验证
  • 请求拦截
  • RESTful风格
  • 日志

建立一个 web 项目

根据自己的使用习惯,创建一个 Eclipse java 项目或 maven jar 项目。

在 pom.xml 配置依赖

1
2
3
4
5
6
7
8
9
10
11
12
13
14
15
16
17
18
19
20
21
22
23
24
25
26
27
28
29
30
31
32
33
34
35
36
37
38
39
40
41
42
43
44
45
46
47
48
49
<project xmlns="http://maven.apache.org/POM/4.0.0" xmlns:xsi="http://www.w3.org/2001/XMLSchema-instance"
xsi:schemaLocation="http://maven.apache.org/POM/4.0.0 http://maven.apache.org/maven-v4_0_0.xsd">
<modelVersion>4.0.0</modelVersion>
<groupId>com.codevip</groupId>
<artifactId>01-hello</artifactId>
<packaging>war</packaging>
<version>1.0</version>
<name>springMVC-study</name>

<properties>
<project.build.sourceEncoding>UTF-8</project.build.sourceEncoding>
<maven.compiler.source>1.8</maven.compiler.source>
<maven.compiler.target>1.8</maven.compiler.target>
<spring.version>4.1.3.RELEASE</spring.version>
</properties>

<dependencies>
<dependency>
<groupId>org.springframework</groupId>
<artifactId>spring-webmvc</artifactId>
<version>${spring.version}</version>
</dependency>
<dependency>
<groupId>javax.servlet</groupId>
<artifactId>javax.servlet-api</artifactId>
<version>3.0.1</version>
<scope>provided</scope>
</dependency>
</dependencies>

<build>
<finalName>springMVC-hello</finalName>
<plugins>
<plugin>
<groupId>org.apache.tomcat.maven</groupId>
<artifactId>tomcat7-maven-plugin</artifactId>
<version>2.2</version>
<configuration>
<port>8888</port>
</configuration>
</plugin>
<plugin>
<groupId>org.apache.maven.plugins</groupId>
<artifactId>maven-dependency-plugin</artifactId>
<version>2.9</version>
</plugin>
</plugins>
</build>
</project>

依赖树
springmvc

在 web.xml 配置主控制器

在web.xml配置 org.springframework.web.servlet.DispatcherServlet

springmvc

1
2
3
4
5
6
7
8
9
10
11
12
13
14
15
16
17
18
19
20
21
22
23
24
25
26
27
28
29
<?xml version="1.0" encoding="UTF-8"?>
<web-app xmlns:xsi="http://www.w3.org/2001/XMLSchema-instance"
xmlns="http://java.sun.com/xml/ns/javaee"
xsi:schemaLocation="http://java.sun.com/xml/ns/javaee
http://java.sun.com/xml/ns/javaee/web-app_3_0.xsd" id="WebApp_ID" version="3.0">

<servlet>
<servlet-name>DispatcherServlet</servlet-name>
<servlet-class>org.springframework.web.servlet.DispatcherServlet</servlet-class>
<init-param>
<param-name>contextClass</param-name>
<param-value>org.springframework.web.context.support.AnnotationConfigWebApplicationContext</param-value>
</init-param>
<init-param>
<param-name>contextConfigLocation</param-name>
<param-value>com.tz.WebMvcConfig</param-value>
</init-param>
<load-on-startup>1</load-on-startup>
</servlet>
<servlet-mapping>
<servlet-name>DispatcherServlet</servlet-name>
<url-pattern>/</url-pattern>
</servlet-mapping>

<welcome-file-list>
<welcome-file>index.jsp</welcome-file>
</welcome-file-list>

</web-app>
  • contextClass:以注解方式解析配置信息
  • contextConfigLocation: 配置信息路径

WebMvcConfig

WebMvcConfig 是 springMVC 的主配置文件

1
2
3
4
5
6
7
8
9
10
11
12
13
14
import org.springframework.context.annotation.ComponentScan;
import org.springframework.context.annotation.Configuration;
import org.springframework.web.servlet.config.annotation.EnableWebMvc;
import org.springframework.web.servlet.config.annotation.WebMvcConfigurerAdapter;

/**
* SpringMVC Configuration
*/
@Configuration
@ComponentScan
@EnableWebMvc
public class WebMvcConfig extends WebMvcConfigurerAdapter {

}
  • @Configuration: 当前类是配置信息类
  • @ComponentScan: 扫描当前包和递归子包的下的组件
  • @EnableWebMvc: 启用 WevMVC 功能

控制器

1
2
3
4
5
6
7
8
9
10
11
12
13
14
15
16
17
18
19
20
21
22
23
24
25
import org.springframework.stereotype.Controller;
import org.springframework.ui.Model;
import org.springframework.web.bind.annotation.RequestMapping;

import javax.servlet.http.HttpServletRequest;

/**
* Hello Controller
* @author: steven
* @since 2016-10-28
*/
@Controller//当前类是一个控制器
public class HelloController {

//将 URL 映射到方法
@RequestMapping("/hello")
public String hello(HttpServletRequest request, Model model) {
String name = request.getParameter("name");
//需要显示在视图中的数据
String result = "Hello SpringMVC!";
model.addAttribute("result", result); //稍后会自动转为 request 对象的 attribute
return "/WEB-INF/jsp/hello.jsp";
}

}

@Controller

  • 位置:类名上方
  • 作用:表示当前类是被视作为一个控制器

@RequestMapping

  • 位置:类名或方法名上方
  • 作用:将某一个路径,交给当前类或方法来处理。

Model

  • 控制层使用 Model 向视图层传递数据
  • Model 包含需要在View中呈现的数据
  • Model 的本质就是一个java.util.Map
  • 开发者根据需要向 Model add Attribute,然后会自动转为 request请求对象的attributes属性

hello.jsp 页面

WEB-INF/jsp/hello.jsp

1
2
3
4
5
6
7
8
9
10
<%@ page contentType="text/html;charset=UTF-8" pageEncoding="UTF-8" language="java" %>
<html>
<head>
<title>Hello Page</title>
</head>
<body>
<h1>${result}</h1>
<hr/>
</body>
</html>

PathListener

1
2
3
4
5
6
7
8
9
10
11
12
13
14
15
16
17
18
19
20
21
22
import javax.servlet.ServletContext;
import javax.servlet.ServletContextEvent;
import javax.servlet.ServletContextListener;
import javax.servlet.annotation.WebListener;

/**
* PathListener
* 在项目启动时,将项目名存入application作用域
*/
@WebListener
public class PathListener implements ServletContextListener {

public void contextInitialized(ServletContextEvent servletContextEvent) {
ServletContext application = servletContextEvent.getServletContext();
String path = application.getContextPath();
System.out.println("set path:"+path+" to application scope.");
application.setAttribute("path", path);
}

public void contextDestroyed(ServletContextEvent servletContextEvent) {
}
}

index.jsp 页面

1
2
3
4
5
6
7
8
9
10
11
<%@ page contentType="text/html;charset=UTF-8" pageEncoding="UTF-8" language="java" %>
<html>
<head>
<title>Index Page</title>
</head>
<body>
<h1>Index</h1>
<hr/>
<a href="${path}/hello?name=jack">点击访问 HelloController</a>
</body>
</html>

运行和调试

  • 打成 war 包,部署至 tomcat 访问
    mvn clean package
  • 直接使用 tomcat7 插件 ( 推荐使用 )
    mvn tomcat7:run

注意点

@RequestMapping 位置

  • 控制器的方法名上方必须使用此注解
  • 控制器的类名上方,可选使用此注解(将起到路径拼接的作用)

编码过滤器

无需自己开发编码过滤器,
由于 spring-web.jar 已提供一个 CharacterEncodingFilter 过滤器,
直接在 web.xml 中配置即可:

1
2
3
4
5
6
7
8
9
10
11
12
13
14
15
16
17
<!-- 编码过滤器 -->
<filter>
<filter-name>EncodingFilter</filter-name>
<filter-class>org.springframework.web.filter.CharacterEncodingFilter</filter-class>
<init-param>
<param-name>encoding</param-name>
<param-value>UTF-8</param-value>
</init-param>
<init-param>
<param-name>forceEncoding</param-name>
<param-value>true</param-value>
</init-param>
</filter>
<filter-mapping>
<filter-name>EncodingFilter</filter-name>
<url-pattern>/*</url-pattern>
</filter-mapping>

在 jsp 页面中使用 JSTL

先在 pom.xml 配置 jstl 依赖

1
2
3
4
5
6
<!--jsp standard tag lib-->
<dependency>
<groupId>jstl</groupId>
<artifactId>jstl</artifactId>
<version>1.2</version>
</dependency>

然后在 jsp 页面头部导入标签库即可(注意要重启tomcat)

1
2
3
<%@ page contentType="text/html;charset=UTF-8" pageEncoding="UTF-8" language="java" %>
<%@ taglib prefix="c" uri="http://java.sun.com/jsp/jstl/core" %>
<html>

如何实现 redirect 重定向

首先了解 forward 和 redirect 的本质区别,见下图:
springmvc
springmvc

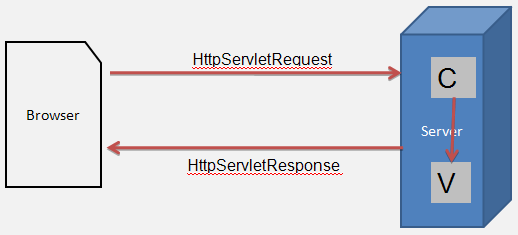
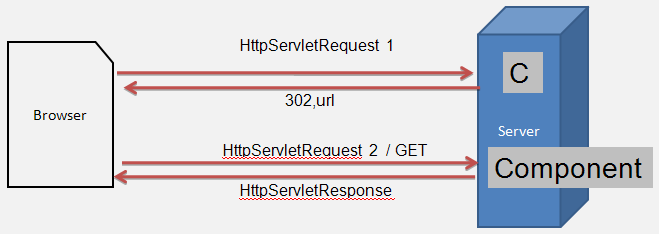
如果在开发期间,需要使用 redirect 重定向,
在 SpringMVC 的控制器中, 直接返回字符串:
格式:
redirect:/路径...
比如:
return "redirect:/index.jsp"; //设置重定向至index.jsp
注意:
只能跳转到项目公开资源,比如各种公开的jsp,html,控制器等.

如何获得 HttpSession 作用域

传统做法:

1
2
3
4
5
HttpSession session = request.getSession();
//存入数据
session.setAttribute("key", "数据");
//读取数据
Object obj = session.getAttribute("key");

推荐做法
直接在方法参数中声明即可
比如:

1
2
3
String hello(Model model, 
HttpSession session,
HttpServletRequest request)

然后就可以直接使用了,so easy!

如果开发ajax,控制器怎么返回纯文本的内容

基于@ResponseBody和 @RequestMapping 的 produces属性,
可以灵活设置响应的内容和格式.
比如:

1
2
3
4
5
6
7
8
9
10
11
12
13
14
@ResponseBody //将内容直接返回,无需视图显示
@RequestMapping(value = "/helloAjax", produces = "text/plain") //此URL资源返回的是一个 text/plain 纯文本
public String getPlainText(HttpServletRequest request) {
System.out.println("HelloController getPlainText() run...");
String name = request.getParameter("name");
String result = helloService.hi(name);

if(满足某个条件){
return 1;
}else{
return 0;
}
return result;
}